background

Showing posts with label curtains. Show all posts

Wednesday, June 17, 2015

DIY: No-Sew Stagecoach Shade

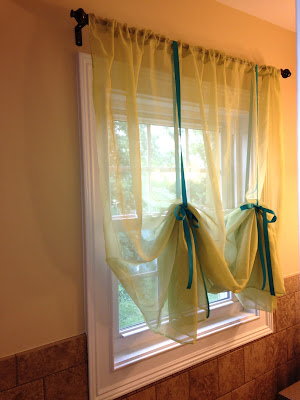
If you aren't into sewing curtains; even the half window panels that are for beginner level decorators, you can try this little house hack that I recently conjured. I had two lime green sheer panels but decided to put up something a bit more neutral in our guest bedroom instead. 

Shortly thereafter, I found myself needing some curtains for our upstairs guest bathroom too. That lead me to hanging a full panel, staring at it for awhile, and eventually adding some leftover ribbon from wedding decor to create this masterpiece.


They would certainly look better had I cut a bit off of the bottom before gathering, but I wanted to preserve length incase I want to revert back to full double panels again.


I hope you've enjoyed this quick hack for curtains and if you make your own, please share your improvements in the comment section below!

Thanks for stopping by the Humble Hammock! Do come back!
Cara


Monday, June 15, 2015

DIY: Half-Window Curtains

I know sewing isn't for everyone, but in the winter months I become especially handy with the sewing machine my parents bought me a few years ago. It's not super fancy, but it does the job and allows me to get crafty with fabric from time to time. 

This Spring I decided to make curtains for our downstairs guest bathroom to keep any guests in our back yard from seeing what goes on when the bathroom door is closed. Amazon was my saving grace and lent one yard of this fun feather fabric to our feathery bathroom. You can buy it here.


I cut the fabric in half and sewed all four of the edges to create a finished look. The sides were about .5" and the top of the curtains were made a little wider at 1.5", so that the tension rod could go through. Yes, I used a tension rod since these were half window curtains. They are $3-$4 at Lowes and are no fuss for those who don't want to break out the drill and screws. 


Here is the finished panel. While pinning and sewing, I compared the panels from time to time to be sure they were identical to avoid one panel becoming a different size than the other. I may be OCD in some respects, but when I sew, draw and cut, I always eye it.


And here you have it! This wall art is from Target and made a nice accent with the feathers in the curtains. It was actually my inspiration for this project. It was purchased in store and is not available online, but would be very easy to recreate with nails and string of your own!


Thanks for stopping by the Humble Hammock! Do come back :)
Cara

Saturday, January 17, 2015

DIY Edition: Curtains & Pillows

I wanted to put together some quick curtains for our garage windows on the cheap. My endeavor began with a trip to Hobby Lobby where I picked up this grey cotton blend fabric for $5.99/yard. I bought four yards knowing that I would probably end up with a little extra. 

The color of the curtains in the garage didn't really matter, but I knew that I wanted something neutral to keep the light that comes in from looking eerie. I chose grey because I knew I could do something with the extra fabric in another room of the house.


To begin, I rolled out the fabric and measured the length of the window (something near 51"). I decided to add 3" to the top and bottom (6" total) to allow for a 1.5" folded curtain seam. My final cut was at 57" for both panels. The width of the fabric on the bolt was enough for the width of my windows so I didn't need to cut it vertically. If I had, the panels would have looked more finished.

Here's the inseam for the curtain rod. Before sewing I pinned the seam and stuck the rod through to be sure that it would fit. 


Here we sew!


Ta-da!


After all of that I still had enough left over to recover these pillows for my grey and yellow living room. To get started I made sure to have enough fabric to fold over the pillow by placing the pillow on the printed (top) side of the fabric. Then, by folding the back side up, I pinned fabric to the the left and right side of the pillow. Sewing this pillow inside out is key so that the seams can hide.


Once the sides are sewn and flipped right side out with the pillow slipped inside, the top can be pinned by folding both the front and back edges into the pillow. Pin so that the seam is tight the pillow fits snugly in the cover.


To hide the seam, I use a slip stitch (go to the :50 mark). Pillow case covers aren't like pillows, in that with pillows you can sew the fourth side nearly all of the way before stuffing and then slip stitching the remaining 5" or so.

Here is the finished product! I made this burlap pillow over a year ago and freshened it up with a little paint and a monogram. 


$20 for two new pillow covers and two curtains seems like a pretty good deal to me! Thanks for stopping by the Humble Hammock. Do come back :)

Cara