background

Showing posts with label upcycle. Show all posts

Wednesday, March 8, 2017

Easy Sidewalk Makeover

If it’s a sunny day in Indiana, it’s almost guaranteed that you’ll see my husband and I tooling about the yard. Whether we’re starting a big project or simply picking up fallen sticks, we’re sure to be out and about. 

When we bought our home nearly four years ago, the yard was by far the biggest eyesore. Visit the posts on koi pond removal, shed renovation or patio flip to see what I mean. (And please excuse some missing photos. Blogger no longer uses Picasa to host photos and when switching to Google many of the images were lost 😥).

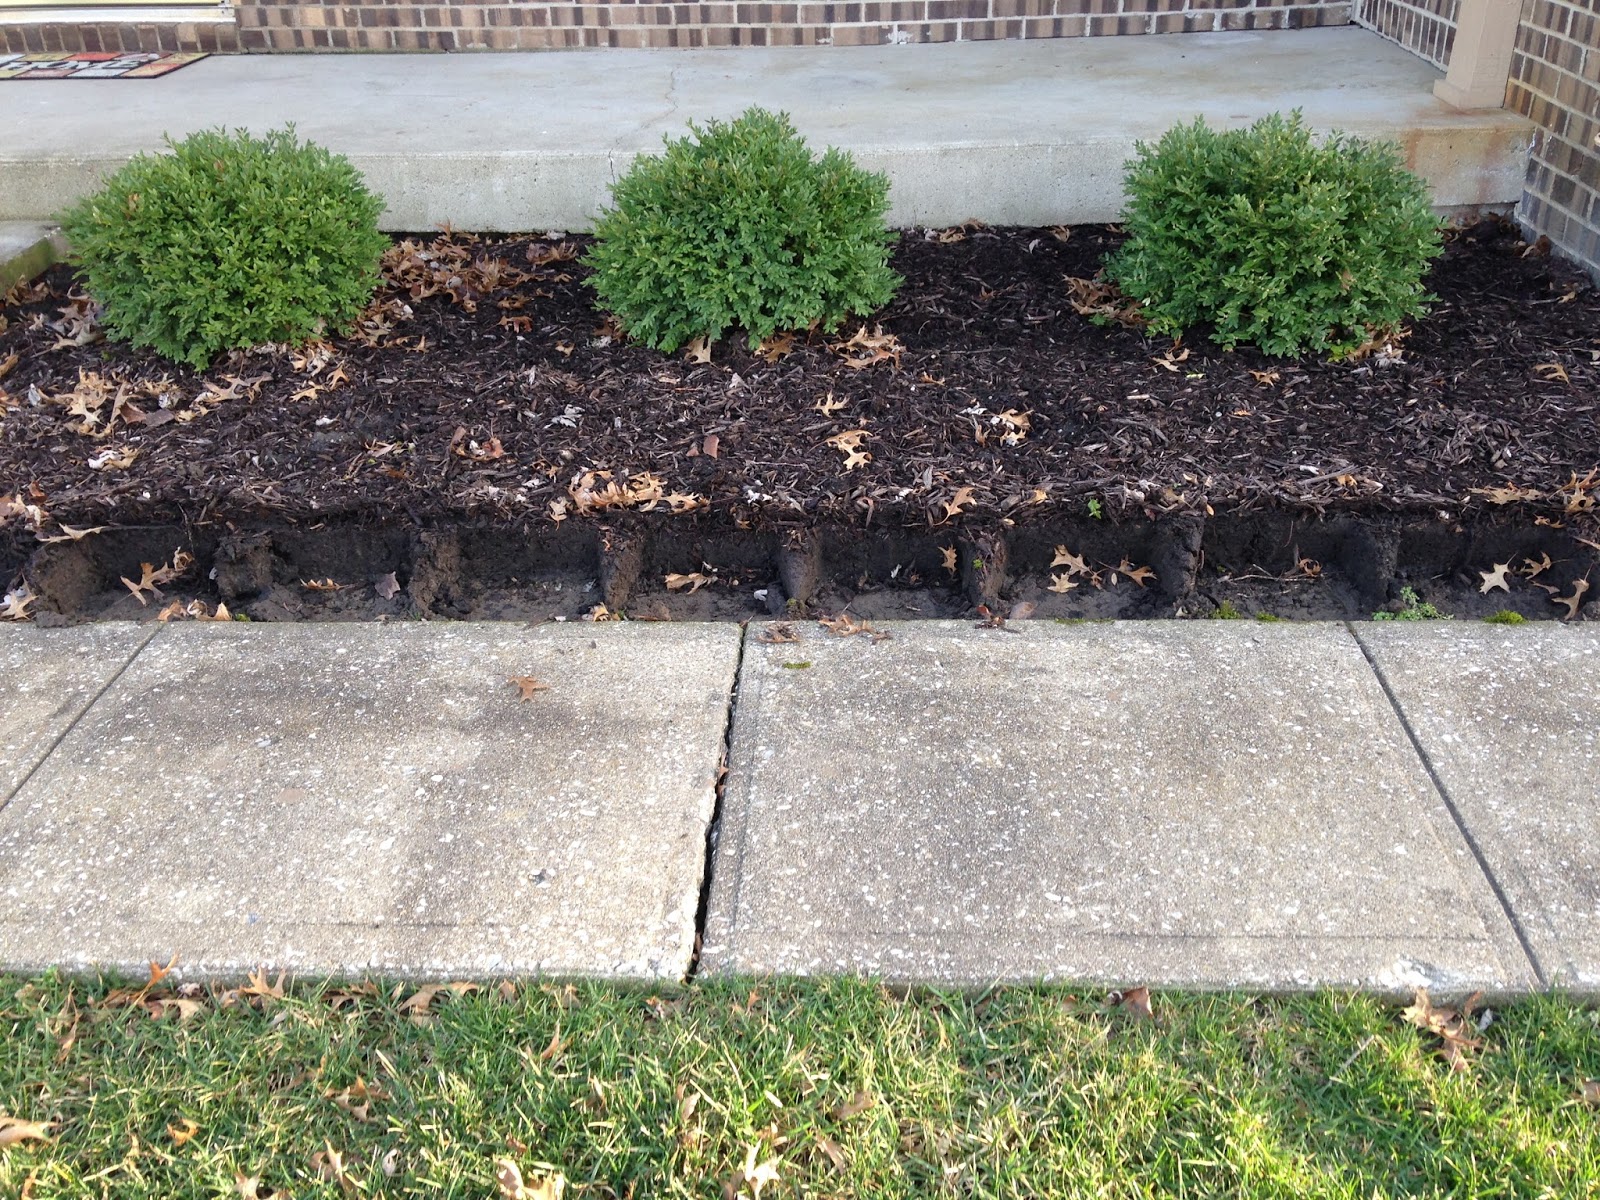
The yard itself was sparse, stringy and uneven but I’ll leave that for another post. The biggest eyesore, at least from the road, was our driveway and sidewalk. 

(Pause… if anyone knows how to request an updated Google street view of a home/street PLEASE MESSAGE ME NOW!)

You can see that update here, but before we were able to pull the trigger on that, we had to do some prep work.

Subject A:


These landscaping rocks were likely nice back in their prime. Years of moisture and shade allowed them to become discolored and drab and power washing wasn’t doing them justice. Since we were replacing our sidewalk anyway, removing them seemed like a good idea.


Now you’re probably wondering why I would waste an entire blog post talking about the removal of landscaping rocks. This again, is a gentle reminder that one man’s trash is another man’s treasure. 

I sold these stones to some folks via Facebook garage sale. When they picked them up and told me what they intended to do with them, I felt was delighted to hear that they were going to live another purposeful life and not join the troves of reusable treasures at the landfill. One lady was using them to line the bottom of her fire pit while another was using them to build a fire pit. Awesome.

Oh, and I did make a quick buck (I think something like $20-$30), much to the surprise of my husband who is still dumbfounded at what people buy.

With that, I’ll challenge you… what trash of yours is another man’s treasure?

Thanks for stopping by the Humble Hammock! 
Cara

Sunday, December 18, 2016

DIY: Necklace Makeover

I bought this adorable, snake-skin collar necklace from Kohls a few years ago. Like most accessories, it began to show wear and the glue from the snake skin began to peel off.

Rather than throw it away, I decided to attempt to re-skin it with some new material. I bought a roll of sticky drawer liner from Target (yep, for $2), and cut it to fit by tracing the old snake-sin pieces.


I then peeled the back of my cutouts and stuck them to the necklace!


Thanks for stopping by the Humble Hammock!
Cara

Tuesday, July 26, 2016

DIY: Plant Stand Makeover

Thrifting is all about the hunt. Truth be told, I've spent a couple of years looking for a specific item. Sure, I could go purchase it new from a big box store or even look on eBay, but the reality is that the hunt is more exciting than finding the item. Sometimes I even find what I'm looking for and decide to be picky and pass that particular product over to find one in better shape. 

This spring I took my mom antiquing, or "teeking" as my grandmother calls it. It's something that we both enjoy and it's a good excuse to spend some quality time together. While out and about in some unchartered teeking territory, we came upon not only a humble little shop, but a honey hole of inexpensive and unique items.

The only find I'm going to blabber on about today is this $7 plant stand. It was handmade by some form of carpenter, who knows how long ago. I was immediately drawn to the size (which would pair well with a taller stand and a ground-level pot) and the fun shape.

It doesn't take a rocket scientist to see that all this little gem needed was a fresh coat of paint and new home. Both are things that I happen to be able to provide.


I made quick stop in the paint aisle during my subsequent home store trip and picked up this $3 can of shiny gold paint. Then I zipped home and ran the grittiest sandpaper I could find over the stand.


Within ten minutes I took this stand from 1970 to 2016 and I couldn't be happier with the end result!


Thanks for stopping by the Humble Hammock! Be sure to follow this page or bookmark it in your browser for more great DIY inspiration later!

Friday, March 7, 2014

DIY Edition: Home Decor


Home décor has really taken a fancy to big, bold letters and phrases. Trends have encouraged us to decorate our dwellings with large vintage metal letters, monograms, and artistic photo montages spelling out our last names. My caveat with this trend is the repetitiveness of certain phrases and words, such as ‘live, laugh, love’ and ‘home sweet home.’ Understand that this is entirely my personal preference and by no means do I detest those who display said inspiration in their homes. As the Brits would say, "It's not my cup of tea, dearie."

I had all but removed myself from this trend when my roommate gave me a letter ‘H’ that she had randomly acquired. Being that my last name begins with an ‘H’ I accepted her gift and pondered what I’d do with it. Doing a monogram seemed a bit cheesy and truth be told, my last name is about to change. How silly would an obsolete monogram be at that? So I decided I’d hop on the bandwagon and create a 3-d word montage and display it as home décor.

Here are the materials I used and the approximate price of each:
  • Leftover craft paint + brushes = $0
  • Three 8" paper mache letters from Hobby Lobby = $3.99
  • White floating wall shelf = gift [follow the link below to buy your own]
  • Ceramic birds = $5.00 at a craft fair
  • TOTAL COST: $8.99
With that, I challenge you to do it for less by using odds and ends from your house!


After swinging by the local Hobby Lobby and grabbing three more letters of 8" paper mache for $1.33 each after coupons and specials, I jetted home to paint them. [Remember to use the App from the post Deal or No Deal called Coupon Sherpa.] Although Pinterest would likely have provided a quick design idea for this endeavor, I forced myself to come up with a design independently. Stripes have been catching my eye lately and it just so happens that the letter ‘E’ is a perfect letter for three big stripes. With that, I free handed the stripes on two of the letters.

After glazing the letter 'M' with some dull golden paint, I knew that my décor was complete. I threw the letters up on a shelf that I received for Christmas from Wayfair and added some little ceramic birds from a local craft fair and ‘VIOLA!,’ a completed 3-d word montage was born. By the way, the shelf referenced above is hands down, the best floating shelf I've come across. SUPER easy to hang, very sturdy, and matches the molding throughout our house. I'm smitten with it :)

And here you have it, the finished product. 


Thanks for stopping by the Humble Hammock and looking around; do come back! 

Cara


Thursday, January 23, 2014

Finding DIY Inspiration

How do I do it; you ask? How do I know what will go with the rest of my decor? Truth be told, sometimes I don't. If I fall in love with a piece and have to have it but it doesn't go with anything else I have, then I may use it for a gift or start a new space. Here are some images I've snapped over time and the vintage finds they have later inspired. Mind you, these were phases and not violet womanly mood swings that I endured over a weekend [not that you were thinking that...].

Over the summer there was a little festival on the Monument downtown Indianapolis. I snapped this inspiring shot one afternoon and later stumbled across a quaint tin a week or two later. I was obsessed with the Ferris wheel and the symmetry that the monument created behind it. Pretty strange how my subconscious was also drawn to this [now] hair-tie holder, right?
This tin was a $5 find at the Southport Antique Mall.
On my way to a photo shoot one morning I stopped in a small town outside of Terre Haute, IN and caught a frame of this stunning door. A few weeks later I picked up another trending item, the old wooden framed window. I printed some photos on 8.5x11 photo paper and taped them on for the time being. Once I tire of that look I'll add some wall decals that also work on a trillion other things [I'll have another post about that at some point]. I found this window for $15 but talked the antique store down to $10 as I bundled items together at the check out. Bundling is a 'picker trick' that requires negotiating. If I buy a big item and some smaller items for instance, I can haggle the price down a bit since I'm buying more. If the store is comprised of lots of vendors they may not do this, but in my instance the owner of the window happened to be the cashier and cut me a deal. Similar windows sell for an arm and a leg as Pinterest users well know.

Wooden barn window from Peru, IN for $10.
While walking to the post office one afternoon I snapped this cozy shot of one of the coolest buildings in Indianapolis; The Blacherne. I love the sleek black lines mixed with the floral landscaping and the brick. That led me to pop the glass and backing out of an old frame and use just the frame to string some jute [baler twine works great too]. I then added some of my favorite Instagram shots by hole punching the printed photo and hanging with a safety pin. A pretty easy craft [no really].

Recycled frame + photos that cost nothing.
Now this may be the most far-fetched yet! This photo was captured in French Lick, IN on my drive home. I loved the color of the bricks against the sky, and beyond that the shapes of the window frames. I harnessed that shape into this potpourri holder [turned tooth brush holder] and put it into my bathroom. I love the crackled glass look and the imperial look of the holder's top. Such an easy find and it can always go back to holding potpourri. I bought this gem at an antique store that's no longer in business. It wasn't an antique [it was a reproduction] but it still satiated my itch.

Potpourri holder turned toothbrush holder for $5.

This isn't how I find every piece, but it's a great way to find what inspires. Once an item looses it's pizzaz I pass it on. Hoarding is one of my biggest fears so I don't keep things forever. Once I've gotten my joy out of them I help them find another home.

Thanks for stopping by the Humble Hammock and looking around; do come back!

Cara


Sunday, January 19, 2014

Vintage Finds

Welcome to the HumbleHammock! To begin, this blog will be categorized as: craft focused and home-project directed with a family and inspirational influence. In an effort to challenge myself I've opted to expose some of my crafty talents and grow in the process. With that, let's get started!

'Thrifting' recently picked up some steam in 2013 with the hit by Macklemore & Ryan Lewis - Thrift Shop. But for those who grew up in a home with a single parent or who understood the idea of stretching a dollar, thrifting is a way of life. I began scouring the local goodwill for name brand items that would help me blend in with my so called 'friends' in middle school. I quickly learned that it was easier to find one-of-a-kind items there instead and repurposed my efforts to finding those by high school. By college I frequented antique stores and began making my apartment and wardrobe something my mother referred to as 'early attic.'

Ingredient tins from Village Market in French Lick, IN. I paid $20 for this mixed set.
Above is one of my favorite finds. After I bought these these ingredient tins they had to be cleaned. Aluminum circa 1950 looks nothing short of grungy but it wasn't anything Mr. Clean's Magic Eraser couldn't handle. Beyond that, they're durable. So much of what you buy today looks like it was made in Jakk's Creepy Crawler Oven and breaks after a few uses. If this stuff's been around since 1950 I'm putting my money on it.

Birdcage found in a small shop in Peru, IN. Paid $10.
Birdcages got pretty hot a year or two ago. Personally, I'm not into birds, but I was drawn to this cage and knew if I hated it I'd have no trouble flipping it in a garage sale. Keeping it handy to collect cards or decorating for parties didn't sound half bad and it went pretty well with my vintage decor. Similar cages are pricey to come by and they are reproductions [which means they don't have nearly the history]. I liked having to put a little elbow grease into reviving this old piece. Initially I thought I'd repaint it but the imperfections grew on me.

1 of 2 vintage bedside lamps. Paid $15 for the pair . Added new shades and wiring.
One of my first projects before college was rewiring these handsome lamps. I found these while thrifting at a local [now nonexistent] shop near my hometown. The set was pretty filthy, but I pulled out the wiring, submerged them in some Dawn and hot water and started scrubbing. At a flea market in Evansville I picked up these fitting shades [by guessing the size] and paid the vendor $5 each for them. The wiring and shade caps came from a local hardware and the final product came together in about half an hour [wiring wasn't hard, but I was a first-timer]. My step-dad is an electric-guru and shed some knowledge for this one, but here's a tutorial on DIY rewiring. All in all I put close to $30 in the pair, but they look like they were made for my 1940's bedroom suite.

Thanks for stopping by the Humble Hammock and looking around. Comment below with any questions on the above projects and do come back!

Cara